Transfers of Monographs (Single & Multivolume)
Transferring a title between locations involves the item record and the holdings record as well as marking the physical
item itself. In most cases, these changes will be handled by Central Technical Services Departments (i.e., MPS, SCMC, and
OSMC), although departmental libraries that are repatriating offsite items (eg. off, ave to ave) should also follow these
procedures. Transfers are initiated by selectors and collection maintenance staff; they will add a note to the holdings
record of all transferred items and an orange rider if the item is to be transferred offsite.
Warning: For contins, check the acquisitions module for the presence of an order record (Ctrl-M). If one is present,
consult your supervisor.
Items should only be transferred if they have a full and complete record in Voyager. If there is no item record,
create one. Do either a title or a call number search and find the Holdings record that does not have an item record attached.
If there is no Holdings record, then that must be created first. Books without any record or with only OTF records must
be fully cataloged before they can be transferred.
Note: This document only details the monograph transfer process for Central Technical Services departments. For departmental
procedures involving inter-library transfers, please see DCMM-520
(Monographic Transfers).
For Pick-and-Scan instructions, click here.
- Item Record
- Verify that any conditions (lost-system applied, withdrawn, missing) in the Item Status have been cleared. Items
that are charged to the Tech Services pseudopatron (DL2TECH) should be left as-is so that the proper message can continue
to display in OPAC.
Note: Items that are being transferred from offsite to on-campus locations must have their barcodes removed from the ReCAP system. This should be done by using the notification form. [If you do not have authorization to use this form, submit your request to the designated individual within your department or contact your supervisor.]
- Change the Permanent Location field to the new location.
- Change the Item Type. Depending on the library of origin and the destination library, the Item Type (noncirc, mils,
rescirc, reslast, etc.) may need to be changed. For example, a book transferring from Butler Stacks to Butler Reference
will need to have the Item Type changed from "circ" to "noncirc".
Exception: Books being transferred to non-circulating locations that are physically housed in a circulating
collection (glxn, lehn, busn) may keep the Item Type of "noncirc". [e.g. transfers from Butler Reference
(ref) to Butler Stacks Noncirculating (glxn).] The selector initiating the transfer will indicate whether they wish
the book to remain non-circulating.
- Clear all Temporary Locations and attendant Temporary Type values.
- Check Item Notes and clear them if present and no longer applicable. All old reinstate/withdrawal notices or ReCAP
notes (if transferring from ReCAP) should be cleared.
- Change the copy field to 0 (zero).
- Barcode Adjustments:
- "Smart Barcodes" that have the originating library location and call number on the barcode should be either replaced
or altered to remove any reference to the de-accessioning library.
- Transfers from Offsite: Items that are transferred from Offsite should have their exterior barcode removed, if
possible, or neatly blacked out with black marker. The item must be re-barcoded internally and the obsolete Offsite
barcode should be deleted from the item record after it has been sent to ReCAP for removal from their database.
- If transferring a multi-volume work, check the hierarchy and the sequence of volumes listed, resequencing in ascending
volume order if necessary.
- Save the record.
- Charge the item to LABL (or BIND) status patrons as appropriate. Note: Books that are being transferred to
Offsite must still be relabeled, but they do not need to be bound unless they are especially worn.
- Holdings Record
- Change the location in the 852 subfield-B to the new location. Overtype the old location rather than creating a new
holdings statement.
- If a call number change is required, the call number must be changed in the H- and I-subfields of the 852 field along
with the first indicator. Situations requiring call number changes or modifications include:
- If the destination location uses a different classification scheme (e.g., Butler Reference, Avery, Rare Books
and subcollections).
- All books with Dewey call numbers.
- If the Holding record has an error in the call number or if the transferred item has a different call number from
all other copies listed on that Bibliographic record.
- Holdings records that formerly existed as OTF records (these records do not have the |i subfield.)
Note: Unlike a change in location, a change in call number does carry over from the Holdings record
to the Item record.
- Delete the 900 field with the transfer notice as well as any obsolete local notes in the the 852 |x subfields that
may have carried over from NOTIS.
- Delete any 014 fields present and update the 008 and Leader fixed fields appropriately. The BCD Macro Express file
contains macros to automate this procedure.
- If transferring a multivolume work, compare the volumes in hand with the summary holdings of the 866 field and make
any necessary adjustments both to the 866 field and to the MARC fixed fields (complete/incomplete, etc.) Any missing
volumes should be withdrawn and all items should be resequenced (if necessary). Consult your supervisor in complicated
or unclear situations.
- Save the record.
- Modifying the physical piece.
Changes to the physical piece are made only to reflect the item's current physical location. Depending on the manner of its original processing, some or all of the following steps may be necessary:
- The new location and call number must be written on the t.p. verso in legible print. Cross out the old location and
call number, even if the call number is the same and there is no location written. Always refer to the call number in
Voyager rather than simply recopying what is in the book already; illegible or stylized handwriting is an open invitation
to error.
- Neatly cross out (with black marker) any stamps or book plates that indicate the library of origin. "Columbia University
Libraries" is fine to leave as is, but "Lehman Library", "Reference Library", etc. should be removed.
- Transfers from Offsite must have the pink "RECAP" sticker removed before they are routed.
- Statistics
- Count each piece transferred as an Addition to the new location. Do NOT count it as a withdrawal from the old one.
(The department initiating the transfer counts the withdrawal.)
- Transfers from offsite back to the original owning library (eg. off,sci to sci) are not counted on the Change
in Size of Collection statistics form. Campus locations and their offsite equivalents are considered to be part of the
same collection.
- Routing
- Place charged books on trucks for delivery to BSP. Make sure appropriate riders (B rider for books to be bound,
orange rider for Offsite materials) are inserted and visible.
- Departmental libraries processing in-house transfers should route for processing according to local practice.
Pick-and-Scan and Transfers
For bulk transfers, Pick-and-Scan can be an invaluable tool, automating many of the steps described above.
Warning: Pick-and-scan will not work for certain types of nonstandard LC call numbers (such as KBL classifications).
You can manually change the call number so that the pick-and-scan process will work, but you must remember to change the
call number back to the original after you're done.
- Sort your books by destination location and double-check your sorting. It's very easy to put a book in the wrong pile
and transfer it to the wrong location.
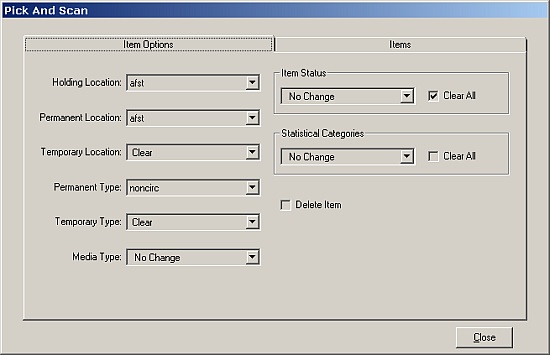
- Open up the Pick-and-Scan and set the following options:
- Holding Location and Permanent Location (Holding Record and Item Record permanent locations): your destination location
-- SASI, AFST, GLX, etc.
- Temporary Location (Temporary Location in Item Record): {CLEAR}
- Permanent Type (Item Type in Item Record): dependent upon destination: reading rooms and items transferred from
Reference are noncirc; most others are circ. Consult CPM-500
or CPM-420 if
you're unsure.
- Temporary Type (Temp. Type in Item Record): {CLEAR}
- Item Status: check the "Clear All" box. [This will erase all status codes EXCEPT "Lost -- System Applied",
which will need to be cleared manually.]
- Click on the Items tab and scan in the barcodes. As each barcode is scanned in, a report will be generated.
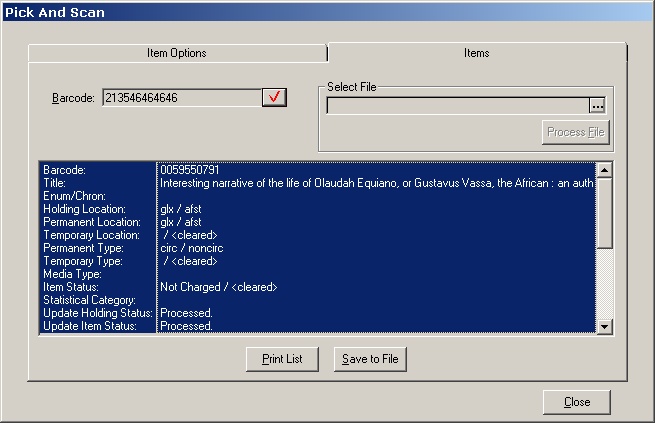
For the first book, verify that the information is correct; everything that follows will be identical. The "Processed"
next to Update Holding Status and Update Item Status means that the Holdings record and Item record respectively have
been modified and saved.
Look over the report as each book is scanned; potential problems such as charges should be made note of at this stage.
- If the barcode is not in the Voyager database, you will get a report that looks like this:
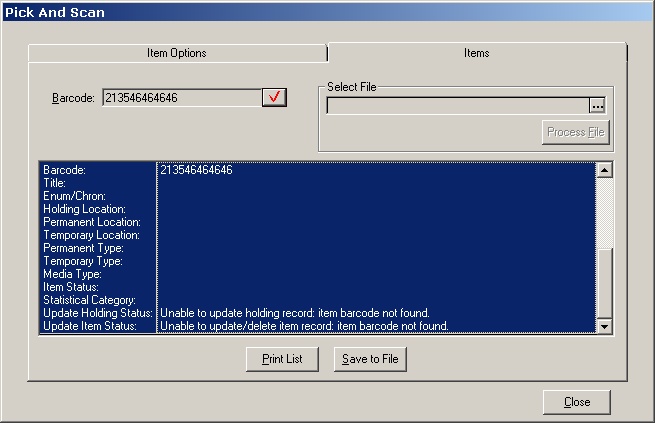 Set those books aside; they must be processed individually using the steps listed above for manual transfers.
- After all of the books are scanned, close Pick-and-Scan. Access each book's Holding record in turn for further processing
-- transfer note message removal, call number reclassification, replacing location/call number on the t.p. verso, etc.
-- as per the above instructions.
Return to CPM Table of Contents
last updated on
2 February, 2007
/{cls}