
If you are installing the DB2 Client Application Enabler from a remote
server, it is better to use the telnet command to open a telnet
session instead of using the rlogin command to connect to your
remote server.

After you mount the CD-ROM file system, use the DB2 Installer program to install the DB2 products.
| Note: | DB2 Version 5 products can co-exist on the same machine with previous versions of DB2. |
where /cdrom is the mount point of the CD-ROM drive on AIX, HP-UX, or SCO UnixWare 7, and /cdrom/unnamed_cdrom is the mount point of the CD-ROM on Solaris.
|
|
It will take some time for the DB2 Installer program to start up, as it is
scanning your system for information.
|
| Note: | Your screen will be different if you have already installed DB2 Version 5 products on your system. See Chapter 4. Installing Additional Products and Creating Additional Instances for more information. |
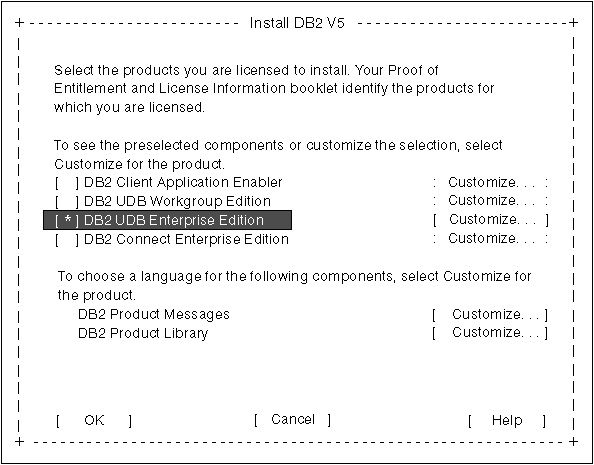
To display the required and optional components for the product you want to
install, select Customize. The optional components that are
most typically used are pre-selected for you. Make your selections and
select OK.
|
|
To refresh the current screen, press the F5 key or Ctrl+L.
|
When you have finished selecting the DB2 product and its components, select
OK. The Create DB2 Services window opens. To undo any
selections you made, select Cancel.
 |
Go to step 9 if you do not want to create a DB2 Instance at this
time.
|
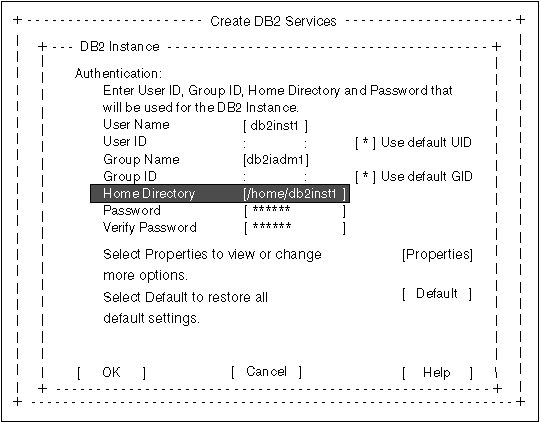
You can use the default values displayed at the DB2 Instance screen or change them:
You will have to enter values for the User ID, Group ID and Password for
the fenced user defined Functions (UDFs) and stored procedures. The
User Name for the fenced UDFs should be different from the User Name of the
DB2 Instance for security reasons.
|
|
Go to step 11 if you do not want to create an Administration Server at
this time.
|
You can use the default values on the Administration Server screen or change them:
After the installation is complete, the software is installed in the
DB2DIR directory,
|
| where DB2DIR | = /usr/lpp/db2_05_00 | on AIX |
|
|
| = /opt/IBMdb2/V5.0 | on HP-UX, SCO UnixWare 7, or Solaris |
|
|
You can use the DB2 Installer program to create additional DB2 instances after you have installed DB2 on your system. To start the DB2 Installer program from the DB2 product directory, type the following command:
|
|
|
Go to Chapter 4. Installing Additional Products and Creating Additional Instances for information on optional installation activities or
proceed directly to Chapter 6. Migrating from Previous Versions and Releases.
|