DB2 Replication Guide and Reference
The following sections describe optional, advanced tasks for defining the
replication subscription.
You can specify a specific target table type if you do not want the default
target type of user copy. Your application might require a target table
that provides a history of changes to the data or an aggregation of columns in
the source table. See Data Transformation Requirements for more information about determining what type of table
you should select based on your application's requirements.
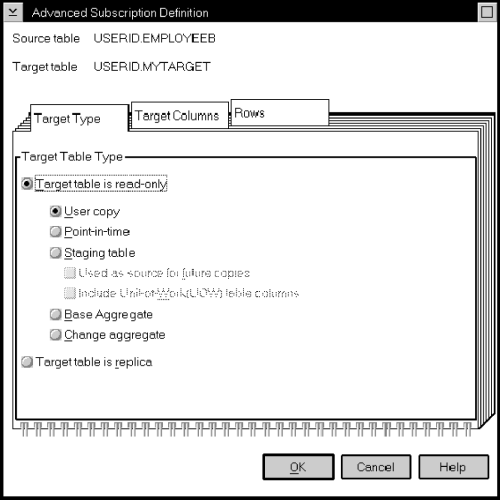
Use the Target Type page of the Advanced Subscription Definition notebook
to select a target type. Figure 23 shows the Target Type page.
Figure 23. The Target Type Page of the Advanced Subscription Definition Notebook
To specify a target table type:
- From the Subscription Definition window, select a source and target table
combination.
- Click on Advanced. The Advanced Subscription Definition
notebook opens.
- Select one of the following table types:
- For read-only target tables, you can select:
- User copy
- A target table that matches the source table data exactly at the time of
the copy.
- Point in time
- A target table that matches the source table, with a timestamp column
added.
- Base aggregate
- A target table that contains aggregated data for a user table appended at
specified intervals.
- Change aggregate
- A target table that contains aggregated data based on changes recorded for
a base table.
- Staging
- Also known as a CCD table. Usually, a CCD table is a target table
that is a join of the source table's change data table and unit-of-work
tables. However, it may be created directly by an application program
or by another product. A staging table can be an internal CCD table or
a local or remote CCD table.
- For updateable target tables, select Target table is replica,
an updateable target table that is used to replicate data back to the source
table or to other target tables.
- If you are finished using the Advanced Subscription Definition notebook,
select OK to close the notebook. Otherwise, use the other
pages of the notebook to define the target table columns and rows as
needed.
- Complete the subscription. See step 9.
For some applications, the target table does not need all of the rows or
columns that exist in the source table. Or, you might need to rename or
create new columns for the target table. For data enhancement,
performance, security, or other reasons, you can subset the target table
vertically (delete, create new, or rename columns) or horizontally (enter an
SQL predicate) using the advanced features of the Define Subscription
window.
The following section describes how to define the target table columns that
are copied to the target table. For data restrictions when defining
replication targets, see Data Restrictions.
| Attention: | Replica target tables must contain the same columns as the source
table: they cannot be subsetted, have columns added, or have columns
renamed.
|
To define the target table columns:
- From the Define Subscription window, select a source and target
combination.
- Click on Advanced to open the Advanced Subscription Definition
notebook.
- Open the Target Columns page (Figure 24).
Figure 24. The Target Columns Page of the Advanced Subscription Definition Notebook. Use this page to subset, create new, and rename columns for the target table.

- If you want to specify a column as a primary key column for the target
table, click on the Primary Key check boxes next to the column
name.
| Warning: | You are required to select one or more columns as part of a primary key if
you use one of the following target table types: user copy,
point-in-time, replica, or condensed staging tables. If you do not
select columns for the primary key, then the primary key definition is carried
over from the primary key definition of the source table. However, if
the source table does not have a primary key definition, an Apply program
runtime error will occur.
|
- If you want to rename a column, select the column name that you want to
edit, and type over the existing column name. This value can be up to
18 characters and can be an ordinary or delimited identifier.
- If you want to change a column definition for the target table:
- Select Change. The Change Column window opens. It
has the same fields as the Create Column window, shown in Figure 25.
- Optional: Change the name of the column in the Column
name field. The name can be up to 18 characters. This
value can be an ordinary or delimited identifier; for example,
CUST_COUNT.
- Type the SQL expression to change the definition of the column. For
example: COUNT(*).
The expression can contain up to 254 characters and can be any valid SQL
expression. This expression can contain ordinary or delimited
identifiers. Columns used in the expression must be valid after-image
columns from the source table. These column names are listed in the
Available columns box.
See your database SQL reference for information on valid SQL
expressions. Invalid SQL expressions cause an SQL error when the
subscription is processed by the Apply program.
- Optional: To see examples of SQL expressions, click on
Examples.
- Click on OK to close the window.
- If you want to remove a column from the target table, clear the
Subscribe check box next to the column name.
- If you want to create a new computed column or use aggregation for the
target table:
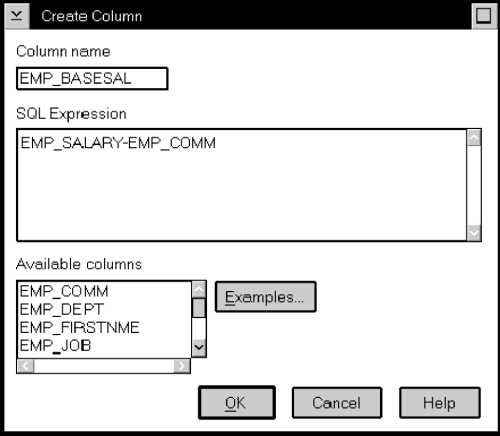
- Click on Create Column. The Create Column window opens,
as shown in Figure 25.
Figure 25. The Create Column Window. You can define new columns for the target table.
- Type the name of the column in the Column name field.
The name can be up to 18 characters and can be an ordinary or delimited
identifier.
- Type the SQL expression defining the new column.
The expression can contain up to 254 characters, can be any valid SQL
expression, and can contain ordinary or delimited identifiers. Columns
used in the expression must be valid after-image columns from the source
table. These column names are listed in the Available
columns box.
See your database SQL reference for information on valid SQL
expressions. Invalid SQL expressions cause an SQL error when the
subscription is processed by the Apply program.
- Optional: To see examples of SQL expressions, click on
Examples.
- Click on OK to close the window.
- If you are finished using the Advanced Subscription Definition notebook,
click on OK to close the notebook. Otherwise, use the Rows
page to define the target rows as needed.
- Complete the subscription. See step 9.
The following section describes how to define the target table rows that
are copied to the target table and the restrictions for doing so.
Row Predicate Restrictions:
- You can use only column names from the Target columns list on
the Target Columns page; these names are also listed in the Available
columns list box.
- Do not use before-image columns or computed columns.
Before-image columns are supported in change data tables but not user
tables. Do not use these columns and predicates without detailed
knowledge of the register control table values. (If you use these
columns, full refresh is no longer available.)
- If you created computed columns on the Target Columns page, you must
provide a GROUP BY clause. A computed column is an SQL expression which
includes a function that summarizes data. Examples are
SUM(WITHDRAWALS), COUNT(*), and AVG(BALANCE). Both base and change
aggregate target tables must have a GROUP BY clause.
- Do not type WHERE in the clause; it is implied.
Type WHERE in the clause for subselect statements.
- Do not end the clause with a semicolon (;).
- If your WHERE clause contains the Boolean expression OR, enclose the
predicate in parentheses; for example, (COL1=X OR COL2=Y).
- If the target table is a change aggregate table and contains before-image
columns, you must include the before-image columns in the GROUP BY clause on
the Rows page, even though the before-image columns are not displayed in the
Source columns box.
- You must provide a dummy WHERE clause when both of the following
conditions are true:
- You are creating an aggregate column that requires a GROUP BY
clause.
- You do not use any other predicate in the WHERE field.
You can receive Apply program run-time errors if you do not provide the
dummy WHERE clause in this situation.
To define the target table rows:
- From the Define Subscription window, select a source and target
combination.
- Click on Advanced to open the Advanced Subscription Definition
notebook.
- Open the Rows page (Figure 26).
Figure 26. The Rows Page of the Advanced Subscription Definition Notebook. You can subset the rows for the target table by typing in a WHERE clause.
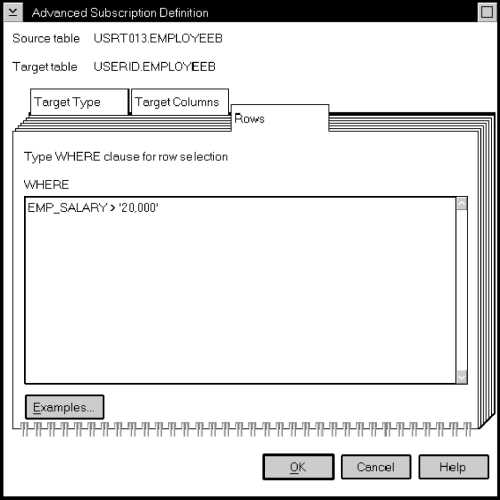
- To specify which rows are copied to the target table, enter an SQL
predicate in the WHERE field. The predicate can contain
ordinary or delimited identifiers. See your database's SQL
reference for more information about WHERE clauses.
Attention: Do not type the word WHERE. It is
automatically supplied during processing.
- To see examples of SQL predicates, click on Examples.
- If you are finished using the Advanced Subscription Definition notebook,
click on OK to close the notebook.
- Complete the subscription. See step 9.
WHERE clause examples:
The following examples contain WHERE clauses that you can use to filter
rows of the target table. These examples are very general and designed
for you to use as a model. You can also click on Examples on
the Rows page to link to additional examples in the online help. See
your database's SQL reference for more information about WHERE
clauses.
- WHERE clause specifying rows with specific values
To copy only the rows that contain a specific value, such as MGR for
employees that are managers, use a WHERE clause like:
EMPLOYEE = 'MGR'
- WHERE clause specifying rows with a range of values
To copy only the rows within a range, such as employee numbers between 5000
and 7000 to the target table, use a WHERE clause like:
EMPID BETWEEN 5000 AND 7000
- Dummy WHERE clause
To support aggregation, assuming that the EMPID column is defined as NOT
NULL, use a WHERE clause like the following:
EMPID IS NULL
You can set the copying schedule when you define a replication
subscription. You can use relative or event timing. See Data Currency Requirements to determine what kind of timing to use.
Set the timing of the replication subscription from the Subscription Timing
notebook, accessed by clicking on Timing from the Subscription
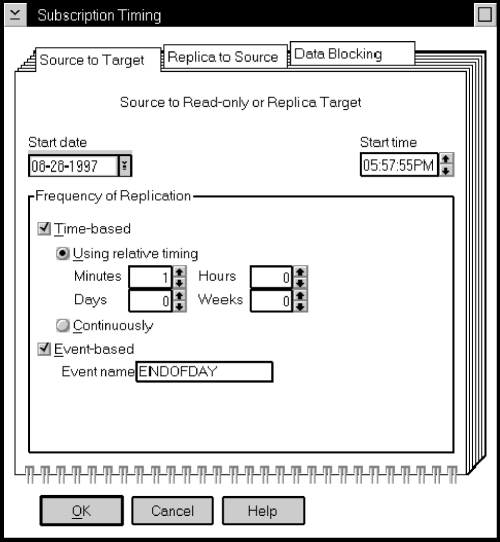
Definition window. The following figure shows the Subscription Timing
notebook. There are two timing pages. Both pages have same
fields.
- Source to Target
- The timing information for replicating changed data from the replication
source tables to the target tables.
- Replica to Source
- The timing information for replicating changed data from replica tables to
the replication source tables. Complete this page only for replication
subscriptions with replica tables.
Figure 27. The Subscription Timing Notebook. You can specify relative or event timing for the replication subscription.
To specify a time-based frequency:
- From the Define Subscription window, click on Timing.
The Source to Target page of the Subscription Timing notebook
opens.
- Specify the date on which you want the Apply program to start replicating
the replication subscription in the Start date field.
- Specify the time that you want the replication to start in the Start
time field by typing over the existing characters or using the spin
buttons.
- Select the Time-based check box.
- Choose the type of interval that you want by selecting one of the
following radio buttons:
- Using relative timing
- Specifies a specific interval, in minutes, hours, days, or weeks.
Use the radio dials to specify the interval that you want.
- Continuously
- Specifies to replicate continuously.
- If you are finished with this notebook, click on OK.
Otherwise, click on one of the other notebook tabs to specify replica to
source timing or data blocking for the replication subscription.
- Complete the subscription. See step 9.
To specify an event-based frequency:
- From the Define Subscription window, click on Timing.
The Source to Target page of the Subscription Timing notebook
opens.
- Click on the Event-based check box.
- In the Event field, type the event name with which you will
populate the event table to trigger replication. This value can be an
ordinary or delimited identifier.
- If you are finished with this notebook, click on OK to close
the notebook. Otherwise, click on one of the other notebook tabs to
specify replica to source timing or data blocking information for the
replication subscription.
- Complete the subscription. See step 9.
See the "Scheduling Subscriptions with the Event Table" section in the
Capture and Apply chapter for your platform in this book.
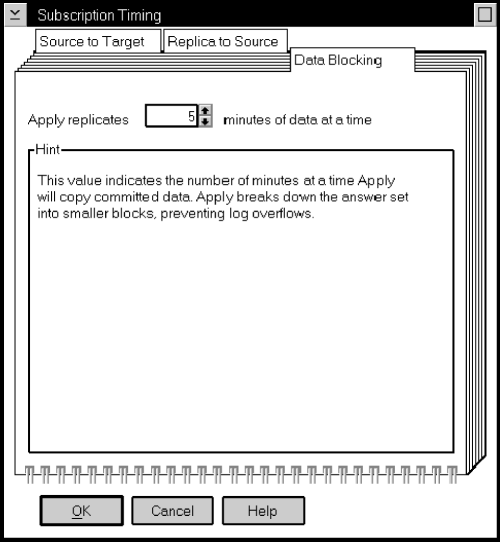
You can specify the number of minutes of data that the Apply program copies
at a time. This value helps the Apply program break down a large block
of changed data into smaller subscription cycles, preventing spill file or log
overflows. See Data Blocking for Large Volumes of Changes for information on how to determine this value.
To specify a data blocking value:
- From the Define Subscription window, click on Timing.
The Subscription Timing notebook opens.
- Open the Data Blocking page as shown in Figure 28.
Figure 28. The Data Blocking Page of the Subscription Timing Notebook
You can specify the number of minutes of data copied at a time.
|
- Enter the interval value of the number of minutes that you want the Apply
program to copy data at a time.
| Note: | An interval value of 0 means that data blocking is disabled. The
complete answer set will be fetched and applied.
|
- If you are finished using the Advanced Subscription notebook, click on
OK to close the notebook.
- Complete the subscription. See step 9.
You can define SQL statements or CALL procedures to be run before or after
the Apply program copies the data from the source to the target
table.
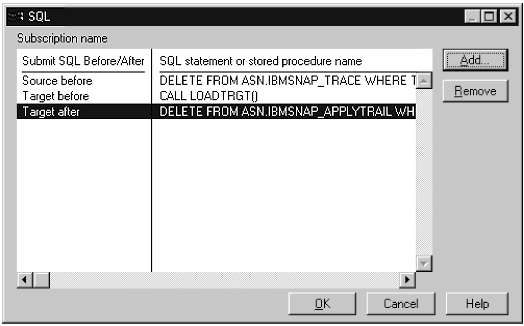
Figure 29. The SQL Window. You can add or remove SQL or CALL procedures for processing at the source server before or at the target server before or after the replication subscription is processed.
To specify SQL statements or CALL procedures statements for the
replication subscription:
- From the Define Subscription window, click on SQL. The
SQL window opens (Figure 29).
Use the SQL window to add or remove SQL statements or CALL procedures that
are submitted at the target or source server either before or after the
replication subscription is processed. The statements are processed in the order they appear in the
list.
- Click on Add. The Add SQL window opens, as shown in Figure 30.
Figure 30. The Add SQL Window. You can add SQL statements or CALL procedures.
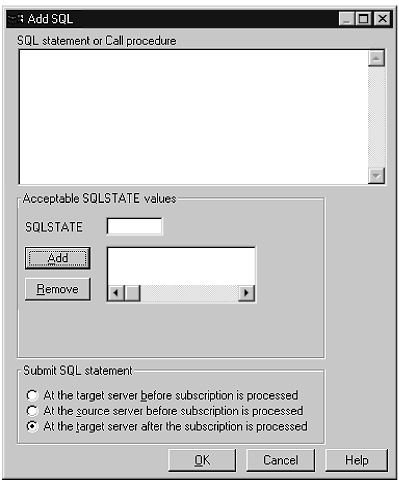
- Type the SQL statement or stored procedure name in the SQL statement
or Call procedure field. The stored procedure name must begin
with CALL. This field can contain ordinary or delimited
identifiers.
- If you need to enter a valid SQLSTATE that the Apply program needs to
pass, type a valid 5-byte SQLSTATE value in the SQLSTATE field and
click on Add. The value is added to the Acceptable SQLSTATE values box. You can enter up to 10 values. The Apply program
interprets these values as successful execution.
- Specify whether you want to submit the SQL statement or CALL procedure at
the target or source server before the replication subscription is processed,
or at the target server after the replication subscription is processed by
clicking on the appropriate radio button in the Submit SQL
statement field.
- Click on OK. The statement is added to the box in the
SQL window and the Add SQL window closes.
- Repeat for each SQL statement or CALL procedure.
- Click on OK to return to the Define Subscription window.
- Complete the subscription. See 9.
To remove an SQL statement for CALL procedure:
- From the Define Subscription window, click on SQL. The
SQL window opens.
- Select the statement you want to remove.
- Click on Remove.
- Click on OK to close the window.
- Complete the subscription. See step 9.
[ Top of Page | Previous Page | Next Page | Table of Contents | Index ]
[ DB2 List of Books |
Search the DB2 Books ]
